We are going to build an indoor greenhouse for your seeds to quickly grow into seedlings for Spring planting. Remember, I don't like to spend my money, so we are going to use items that are already in your house or you can acquire cheap(free). I prefer to use an egg box for my greenhouse because the are large and give the plants plenty of room to grow. And the box already has handles, making it easy to move.
Here are the items you need:

1. Egg box (ask your local grocery store for a free one)
2. Black trash bag (the outdoor kind)
3 .Tape
4. Something sharp to cut the box
5. Scissors to cut the trash bag
6. Saran Wrap or any other clear plastic
7. Paper cups 8oz. size (should be the only thing you have to buy)
Step 1: Begin by cutting the top flaps off of the box. You should be able to see right down in the box now. Next choose one of the longer sides of the box and remove a large portion of the cardboard leaving an inch along the bottom and 2 inches on each side. Your box should look similar to mine.
Step 2: Take the 2 small flaps that you cut off of the top and place them on the bottom of the box so that you have a flat surface. They should fit without any trimming.
 |
| Even out the bottom with extra cardboard. |
Step 3: Grab the black trash bag and cut it open so that it is no longer a trash bag. Now it is one big piece of black plastic. Slide the bag into the box so that bottom and all 3 sides are covered. Use tape anywhere you feel you need to keep the bag from moving very much. Once the bag is taped in, trim the extra plastic along the top of the box. After trimming, use more tape to finish joining the box and plastic at the top. The black trash bag is going to attract more sun and warmth for your seeds and also act as a protective layer for the box when you are watering your plants.
 |
| Your box should now look like this. |
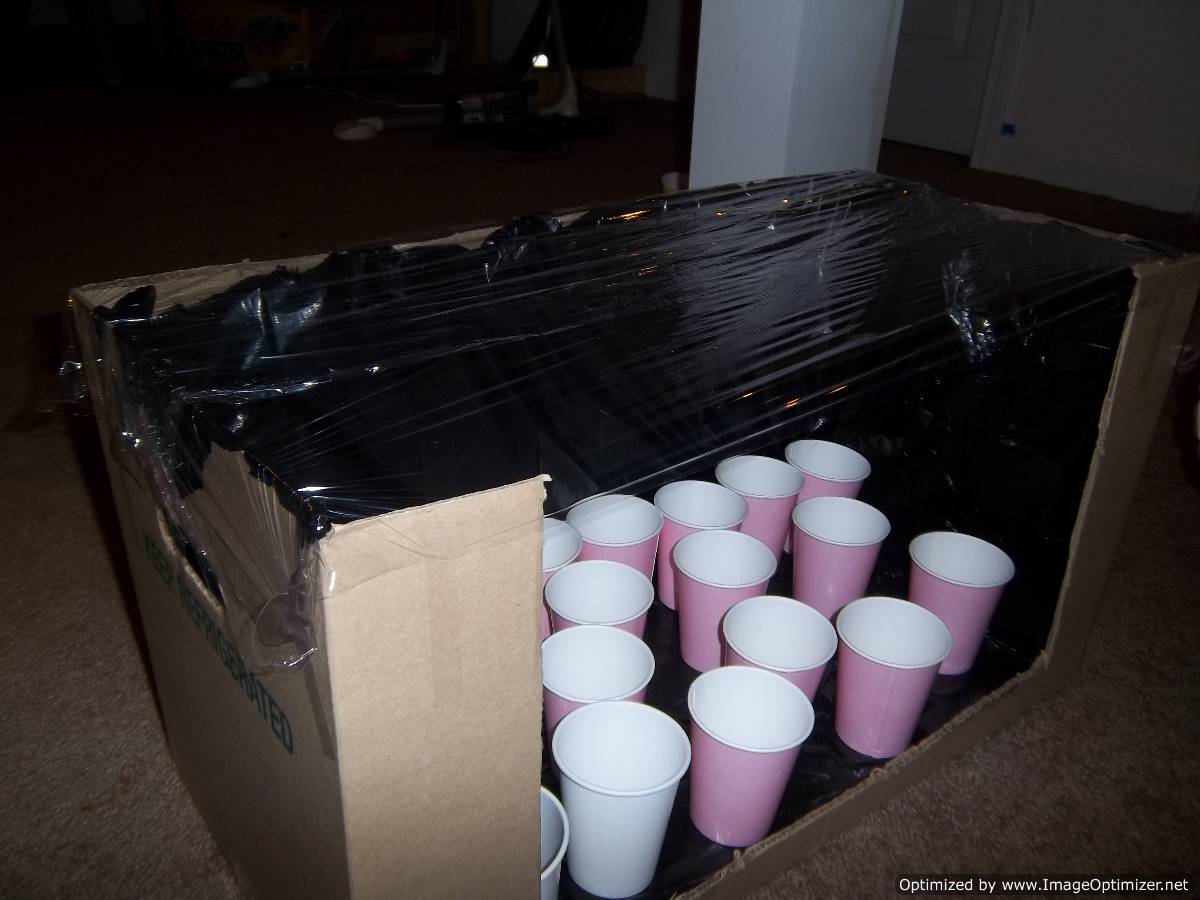
Step 4: Add your cups already filled with dirt, seeds planted, and plant name marked on the cup. Your box can fit up to 32 cups. Now you will stretch 2 pieces of saran wrap across the top so that it is completely covered. Use tape to keep the saran wrap nice and tight.
 |
| Saran wrap top. |
Step 5: The only opening left on the box should be on the front where you cut out the cardboard. This will be your access point for watering. In order for your box to hold heat though, we need to cover this access window with plastic that you can easily open and close. Cut some (3-4) small strips of cardboard and tape them along 3 sides of a piece of saran wrap that is longer than the opening. Lastly you will tape the saran wrap on the top of the box so that it hangs like a curtain. The pieces of cardboard on the sides and bottom keep the saran wrap from bunching up and allow you to lift the curtain to gain access. When you fold it back down the weight of the cardboard un-bunches the saran wrap easily.
 |
| This step can get tricky. Don't give up! |
Your indoor greenhouse is done! Feel free to add some pieces of foil to the interior walls if you will be placing this box in a window instead of under a light. As the sun moves, the foil will help reflect the rays and increase the temperature in the box. Let me know how your box works for you.
 Please feel free to share my plans, but do not steal my plans. Please link back to my site and always give credit where credit is due. Thanks!
 1. Egg box (ask your local grocery store for a free one)


This is an awesome idea. And yup, you're right, Walmart is not the best place to buy any seeds! :)
ReplyDeleteI love your blog so far! It's right up my alley! We're urban gardeners as well and have some real success in feeding our family with what we've grown in our city lot! I am so glad to find your blog and am really looking forward to following you!
ReplyDeleteHave a wonderful day!
Thank you Poppy. I hope this blog helps others to see their yard's potential in producing much healthier vegetables than what is found in the store. The best part is that saving money will be an included benefit!
ReplyDeleteI have a small greenhouse in my back yard however, it does get cooler in the evenings even here in S Cal so this sounds like an easy and great way to get my seedlings started. Thanks for the tutorial...I will be posting my results on y PBDesigns blog soon...and be sure to go over and enter my give away on my crochet blog today..its the last day...http://crochetoholic.blogspot.com
ReplyDeleteI am jealous of you. I would love to have a greenhouse in my backyard. Maybe that should be my next venture.
ReplyDeleteOMG thank you SO much! Everywhere else I looked online, when I typed in "cheap" it was still around $100 dollars and I had to go buy PVC and stuff! Thank you! Thank you! Thank you! Thank you!
ReplyDeleteWow thanks I'm going to try this and see how I make out.
ReplyDelete