Monday, January 28, 2013

How to Make a Free Greenhouse

Part of becoming self-reliant is having the ability to grow your own food. Gardening is an enjoyable way to supply your family with healthy vegetables without spending money at the grocery store. I say having your own garden is healthier because you have the choice to not use genetically modified seeds or pesticides. The money you save throughout the year is also worth noting.

Items you will need include an empty plastic container like a 2-liter bottle, duct tape, scissors, drill, dirt, and an optional planter cup. The optional cup makes it easier to transplant the plant into your garden.

The first step is to empty and clean the bottle. After the bottle is clean, drill at least 6 small holes into the bottom of your bottle. This helps the dirt breath and also allows the bottle to drain. Next, you will use the scissors to carefully cut the bottle in half. Leave a 1-inch section intact so that the bottle has a hinge. See below:

Now you can fill the bottle halfway with dirt. Do not fill above the line where you cut the bottle. If you use a planter cup, then you can add this to the bottle at this time as well. When the dirt and planter cup are level, moisten the dirt with a little bit of water.

The final step is to plant your seed in the moistened dirt. After planting the seed, you will close the bottle up and seal it shut with some duct tape. Be sure to water and watch your little seeds start sprouting.

If you are looking for non-GMO seeds check out this package:
Survival Seed Vault - Heirloom Emergency Survival Seeds - Plant a Full Acre Crisis Victory Garden - 20 Easy-to-grow Varieties

Wednesday, August 22, 2012

Make a Rain Barrel

Rain barrels are extremely useful for storing water for a garden and can be treated and used in emergency situations for drinking water. I use a rain barrel for my rear garden because I hate unwinding 50+ ft of hose and winding it back up everyday.

Instead of buying a rain barrel at the store or online for upwards of a $100, you can quickly make your own. This video gives you a basic understanding of building your own rain barrel. You do not have to build it exactly as shown in the video, so feel free to make changes that accommodate your set-up. My main suggestion is that you place the barrel on a foundation so that gravity is helping the water flow.


Monday, February 6, 2012

Egg Shells in the Garden

Did you know that the egg shells you have been throwing away can be quite beneficial to your garden? According to an article I read at askgarden.com, egg shells are actually high in calcium carbonate, which is what you pay money for when you buy lime to lower your garden's acidity. All of the plants in your garden thrive from the calcium in your dirt and quickly gobble up this nutrient so adding egg shells is a free option to improve your garden's potential. I have yet to find anyone on the internet that denies the benefits of egg shells so I am intrigued.

There are many recommendations floating around the internet on how to prepare your shells. I like the idea of cooking them in the oven until they are brittle. The temperature should kill any lingering salmonella and make the shells easier to grind. A mortar and pestle is a nice tool for the grinding. Just add your shells and grind away while you are watching TV. 

The shells can also be used to keep slugs and snails away from your plants. The bugs that must slither across the ground become cut up from the sharp shells and either die or leave. I love this idea because I refuse to spray my plants with any type of pesticide. I would rather lose a plant from bugs than feed my family poison. Just add the shell pieces to the top layer of your garden and reapply as needed.

I will be testing out the egg shells this year in my garden and in my seedling dirt. I am curious to see if my seedlings grow any better with the addition of egg shells.

Let me know if you have had success with egg shells in your garden.

http://www.askgarden.com/3-wonderful-ways-egg-shells-can-help-you-today/

Thursday, January 26, 2012

How To Build an Indoor Greenhouse (CHEAP)

We are going to build an indoor greenhouse for your seeds to quickly grow into seedlings for Spring planting. Remember, I don't like to spend my money, so we are going to use items that are already in your house or you can acquire cheap(free). I prefer to use an egg box for my greenhouse because the are large and give the plants plenty of room to grow. And the box already has handles, making it easy to move.

Here are the items you need:
1. Egg box (ask your local grocery store for a free one)
2. Black trash bag (the outdoor kind)
3 .Tape
4. Something sharp to cut the box
5. Scissors to cut the trash bag
6. Saran Wrap or any other clear plastic
7. Paper cups 8oz. size (should be the only thing you have to buy)


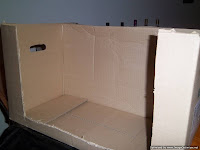
Step 1: Begin by cutting the top flaps off of the box. You should be able to see right down in the box now. Next choose one of the longer sides of the box and remove a large portion of the cardboard leaving an inch along the bottom and 2 inches on each side. Your box should look similar to mine.


Step 2: Take the 2 small flaps that you cut off of the top and place them on the bottom of the box so that you have a flat surface. They should fit without any trimming.
Even out the bottom with extra cardboard.
Step 3: Grab the black trash bag and cut it open so that it is no longer a trash bag. Now it is one big piece of black plastic. Slide the bag into the box so that bottom and all 3 sides are covered. Use tape anywhere you feel you need to keep the bag from moving very much. Once the bag is taped in, trim the extra plastic along the top of the box. After trimming, use more tape to finish joining the box and plastic at the top. The black trash bag is going to attract more sun and warmth for your seeds and also act as a protective layer for the box when you are watering your plants.
Your box should now look like this.
Step 4: Add your cups already filled with dirt, seeds planted, and plant name marked on the cup. Your box can fit up to 32 cups. Now you will stretch 2 pieces of saran wrap across the top so that it is completely covered. Use tape to keep the saran wrap nice and tight.
Saran wrap top.
 Step 5: The only opening left on the box should be on the front where you cut out the cardboard. This will be your access point for watering. In order for your box to hold heat though, we need to cover this access window with plastic that you can easily open and close. Cut some (3-4) small strips of cardboard and tape them along 3 sides of a piece of saran wrap that is longer than the opening. Lastly you will tape the saran wrap on the top of the box so that it hangs like a curtain. The pieces of cardboard on the sides and bottom keep the saran wrap from bunching up and allow you to lift the curtain to gain access. When you fold it back down the weight of the cardboard un-bunches the saran wrap easily.

This step can get tricky. Don't give up!
 Your indoor greenhouse is done! Feel free to add some pieces of foil to the interior walls if you will be placing this box in a window instead of under a light. As the sun moves, the foil will help reflect the rays and increase the temperature in the box. Let me know how your box works for you.

Great Deals on Greenhouses - Eartheasy.com
Please feel free to share my plans, but do not steal my plans. Please link back to my site and always give credit where credit is due. Thanks!


Tuesday, January 24, 2012

Garden Seeds

Now that you have decided on what vegetables your garden will be growing, it's time to buy the seeds. You are more than welcome to buy your seeds at Wal-Mart, but our goal is to become self-sufficient. The seeds at any of your stores are most likely hybrids and you will not be able to harvest the seeds in order to grow next season. So while you may be able to have a prospering garden this year, the garden will not exist next year unless you return to the store to buy new seeds. I prefer to only buy the seeds once.

A great way to find these seeds is from survivalists. Survivalists plan on a world changing event which will make a trip to the local store impractical or pointless. One product that I like is this Survival Seed Vault. The maker guarantees the seeds are not hybrids and non-GMO meaning you can harvest the seeds year after year. There are so many seeds in this package, you could easily split the cost with a friend that is also planning a city garden and there should be more than enough for the both of you.

I tried planting the seeds from Wal-Mart and even though they sprouted, they didn't do much after that. This year I will keep a photo journal comparing Wal-Mart seeds to the survival seeds and we will see which is more successful.

Next post we will talk about building a cheap home-made indoor greenhouse to get your seeds started while it is still cold out.

Monday, January 23, 2012

Plan Your Urban Garden

What does every plant need to thrive and grow? Even more than water. Sun is the correct answer. Now take a look at your property on a nice sunny day and make notes on what parts see the most sun (8+hrs preferably). These are your best areas for a garden. Consider trimming back some trees if they are blocking out the sun completely. Don't rule out your front yard! My front yard sees much more sun than my back yard, so it was obvious that my garden would have the most success in the front.

Delicious Home Grown Zucchini and Cucumber
Now how much square footage can you spare? Consider your first year an experiment that will help you learn the basics. Do you have a 3' x 12' strip that you could dig up? That's a great start. The more land you can devote to a garden, the more homegrown veggies your family will be eating. My first year I experimented with a 3' x 12' strip, 6' x 10' strip, and three pots in my driveway. My garden has been so successful that each year the grass I need to mow decreases while my garden increases.

After you have mapped out the land that is available, think about what vegetables your family would eat. Don't waste your time growing food you will throw away. Cucumbers, squash, eggplant, tomatoes, lettuce, peppers, potatoes, onion, etc. The list can go on and on. Once you have your list, look up the room each plant needs to grow(typically 3' diameter minimum). This will help you determine how many plants you can grow in your allotted space. Do you want to have more plants than what you can fit? Do you have room for pots? Pots can be an urban farmer's friend.

Make a rough sketch of your property with the location and measurements of your garden. Play around with where you want to plant each vegetable so everything fits best.

Cucumber hint: Cucumbers are a vine plant. Build an upright trellis for the vine to climb, thus opening up more garden real estate.

After you have picked your vegetables and completed your sketch, step 1 is complete. Next post we will talk about purchasing seeds. Remember, I like to save money. Growing vegetables from the seed is much more affordable than buying the plants from Lowe's.

Sunday, January 22, 2012

Build a delicious garden in your tiny yard.

Shocking as it may sound, you do not need acres of land to develop a delicious vegetable garden that will yield more food than your family can eat in one season. I live on a city lot that is no larger than 1/10 of an acre and my garden has produced enough vegetables for my family, extended family, and neighbors. And it is easy!

I have created this blog to share my experiences and knowledge with people just starting out and curious about their yard's potential. Everyone has a different circumstance and property so I will attempt to make my posts as general as possible. Please leave your comments and suggestions as my posts continue to grow.